 |
[5]The efficient way to play

· There are efficient ways of expanding territory. If you learn the knack, playing becomes easier, so let's study this little by little.
· Dia. 22. Black plays on a large scale with 1 to 7. This is an efficient way of playing. The X-marked area (3x9) looks like becoming black territory. White has surrounded a narrow area with 2 to 8. It's obvious at a glance that this is inefficient. His X-marked territory (1x9) is pathetic. Black is certain to win the game. |
|
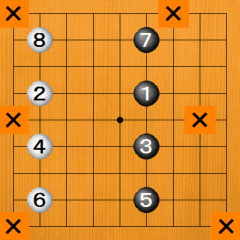
Dia. 22 |
|
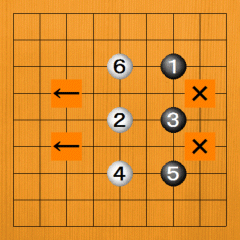
· Dia. 23. Here, too, Black plays expansively with 1 to 9. He looks like getting a big territory on the right. White builds an area on the left with 2 to 8, but it's obviously smaller than Black's. White has to try to play more efficiently. |
|
Dia. 23
|
|
· Dia. 24. Black 1 is the same as in the previous diagram, but White plays closer to the centre with 2. Black makes territory on the right with 3 and 5, but so does White on the left with 4 and 6. This game is even. |
|
Dia. 24
|
|
· Dia. 25. In this game, Black secures the right side with 1 to 5, but while he's doing so White expands his position with 2 to 6. Black had to try a different plan before letting this happen. |
|
Dia. 25 |
|
· Dia. 26. Black tries a different plan with 5. Since Black didn't play there, White plays at 6, whereupon Black plays 7. With 8, White gets the area at the bottom indicated by the arrows, but Black plays 9 and gets more territory, that is, at the top and to right and left. You have to work out the most efficient way of surrounding territory through this kind of trial and error. |
|
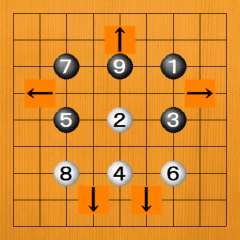
Dia. 26 |
|
· (Actual game example 3) Dia. 27. Black tries to build a position in the bottom right with 1 and 3. White matches him by attaching against the opponent's stones with 4, and trying to convert the area right up to the border into his territory. Up to 8, he goes all out making territory on the left. |
|
Dia. 27
|
|
· Dia. 28. Next, Black plays 1 because he wants to get all the territory on the right and to stop White from invading. Black more or less blocks off this territory up to 7, but White has gone all out in making territory on the left with 2 to 6. Both sides are playing efficiently. |
|
Dia. 28
|
|
· Dia. 29. The bottom is decided with White 1 to Black 6. We will study later why the players play like this. Here it's enough just to follow the course of the game. The top right is also decided with White 7 to Black 10. The game is over. |
|
Dia. 29
|
|
|


