 |
Day Three: Capturing stones, surrounding territory |
|
| Go is a competition to make the bigger territory. Let's study the basic methods for surrounding territory and the knack of doing it efficiently. In the process, we can also capture the opponent's stones. First, we will study how to capture stones and how to avoid having one's own stones captured, then we will learn how to make territory. |
 |
[1]Capturing stones
(a) Taking a stone off the board
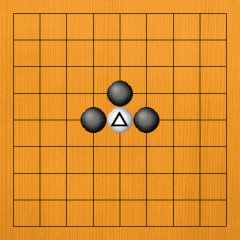
· Taking an enemy stone off the board is the easiest-to-understand form of capturing. The marked white stone in Dia. 1 is surrounded on three sides by Black, so if he makes a move here, he can capture it. |
 |
Dia. 1 |
|
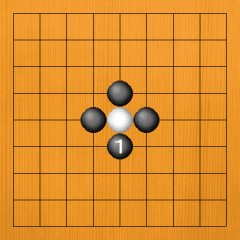
We have already studied this, so we think the reader already knows it. If Black plays at 1 in Dia. 2, he can capture the white stone. He then removes the stone from the board. |
|
Dia. 2 |
|
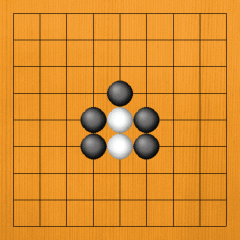
· Even if the white stones increase in number, the principle is the same. If you surround all the vacant points above, below, to the right and to the left, you can capture the stones. Let's looks at Dia. 3. The white stones have only one escape point, so Black can capture them if he plays there. |
|
Dia. 3 |
|
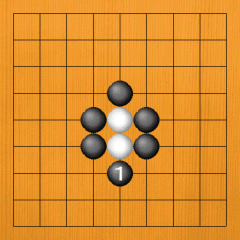
Black can capture the two white stones with 1, so he can remove them from the board. |
|
Dia. 4 |
|
· Dia. 5. There are now three white stones. The same principle applies, so please think about Black's next move before looking at the answer. When you get used to it, you will see the answer at a glance. |
|
Dia. 5 |
|
Dia. 6. Black can capture the three white stones with 1. |
|
Dia. 6 |
(b) Being able to capture
· We don't always take the stones off the board. Please look at Dia. 7. What has happened to these five white stones? The shape is complicated, but almost all the adjacent vertical and horizontal points are surrounded by Black, so this is one step before being captured. Let's think about how Black can capture the stones. |
|

Dia. 7 |
|
Dia. 8. If Black plays 1, he can take the five white stones off the board. That's enjoyable, but actually Black 1 is unnecessary. Did you see this? In short, even if Black plays nothing here, White can't escape. |
|
Dia. 8 |
|
Dia. 9. If White tries to flee with 1, Black can capture him with 2. |
|
Dia. 9
|
|
Also, even if White first plays 1 in Dia. 10, Black can capture the five stones with 2. So, basically, the five stones in Dia. 7 are captured even if Black does nothing. In actual games, there are times when it's important to remove the enemy's stones from the board, but, if they can't escape, you can often leave the position as it is. |
|
Dia. 10
|
|
· (Application 1) Let's look at Dia. 11. What is the situation of these five white stones? Black has various ways of capturing them, but how should he play to capture them efficiently? |
|

Dia. 11 |
|
Dia. 12. If Black plays 1, White can't escape. If you come this far, there's nothing to puzzle over. |
|
Dia. 12 |
(c) Cutting
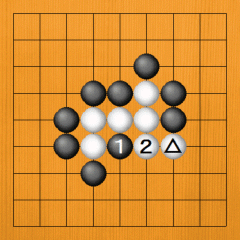
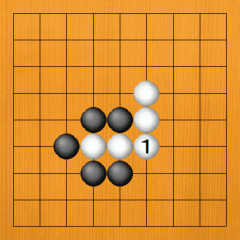
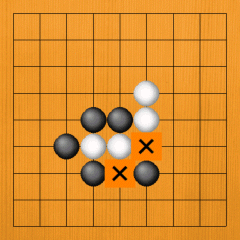
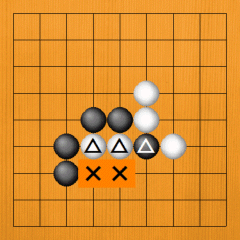
· Dia. 13. The marked white stone has been added. Please think about how to capture the five white stones without being distracted by the extra stone. White is almost completely surrounded, with only the two X points still open. If Black could play both these points, he could take the stones off the board, but in Go we play alternatively, so Black can't play on both these points. |
|

Dia. 13 |
|
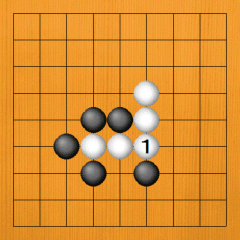
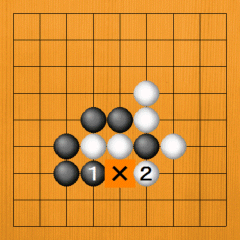
· Dia. 14. If Black plays at 1, White escapes with 2. White links up with the marked stone, so now it won't be easy to capture him. (*The state in which we can capture with one more move - for example, after Black 1, Black threatens to capture with Black 2 - is called 'atari'. A move like White 2, which links up stones, is called a 'connection'.) |
|
Dia. 14 |
|
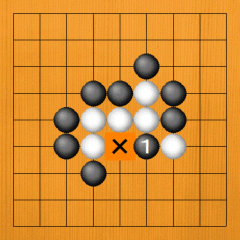
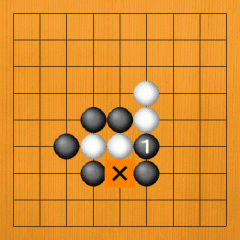
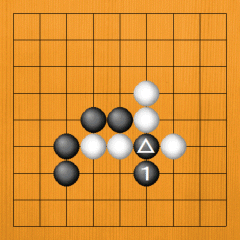
· Dia. 15. If Black plays at 1, he can capture White. The X point is still open, so he can't take him off the board immediately, but White can't escape. |
|
Dia. 15 |
|
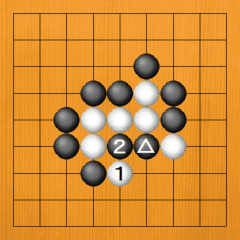
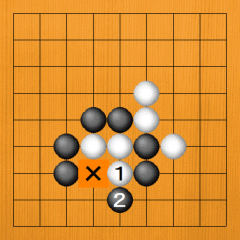
Dia. 16. Even if White tries to flee with 1, Black captures him with 2. |
|
Dia. 16
|
|
· Dia. 17. Even if White moves out one step with 1, Black captures five stones with 2. You can see how effective the marked black cutting stone is. |
|
Dia. 17 |
|
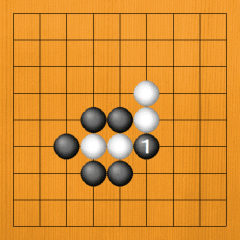
· Dia. 18. Black 1 captures two white stones. Black takes them off the board, so it's easy to understand. |
|
Dia. 18 |
|
Dia. 19. If it is White's turn to play, he can link up by connecting at 1. |
|
Dia. 19 |
|
· Dia. 20. In this position, too, Black can capture two white stones. The only points that are not yet surrounded are the two X points. Which of these points is more important? |
|
Dia. 20 |
|
Dia. 21. When Black plays 1, he can capture White if he can next play at the point of 2, but next it's White's turn, so he will connect at 2. Now he can't be captured. |
|
Dia. 21
|
|
Dia. 22. Cutting at Black 1 is the key move. White can't link up and can't escape, either, even though the X point is open. |
|
Dia. 22 |
|
Dia. 23. Even if White plays out with 1, Black takes him off the board with 2. |
|
Dia. 23
|
|
Dia. 24. If it is White's turn to play, he will link up by connecting at 1. The fate of the two white stones changes depending on whether there's a cut or a connection. |
|
Dia. 24 |
|
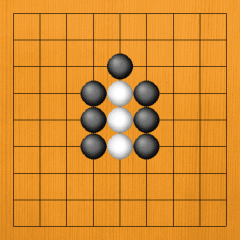
· (Application 2) We are looking at an application of cutting. What is the situation in Dia. 25? First, we have to work out what is actually going on. Black would like to capture the two marked white stones, but there are still two holes, the X points, in Black's enclosing net. Moreover, the marked black move can be captured with one more move by White (it's in a state of 'atari'). Can you find a life-saving move for Black? |
|
Dia. 25 |
|
Dia. 26. When Black plays 1, he can capture White if he can next play at the point of 2, but next it's White's turn, so he will play at 2 and the black stone will be captured. |
|
Dia. 26 |
|
Dia. 27. How about playing at Black 1? Again, White captures the black stone. That means that trying to capture White immediately fails. |
|
Dia. 27
|
|
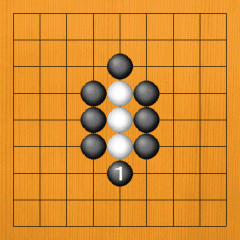
Dia. 28. Rescuing the marked black stone by extending at 1 is a good move. Not only does Black save his own stone, he also makes it impossible for the two white stones to escape. Let's analyse the position by changing the order of the moves. Imagine if Black had played the stone at 1 first and then later played the marked stone. The marked stone cuts White into two. Cutting the opponent's stones is very effective, so please remember that it's one of the ways to make progress. |
|
Dia. 28 |
|
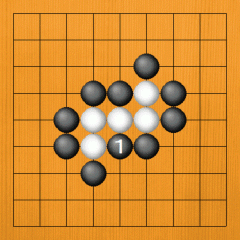
Even if White tries to escape with 1 in Dia. 29, Black 2 is atari, so the three white stones can't escape. Please confirm for yourself that playing 1 on the X point is just as ineffective. |
|
Dia. 29 |
|
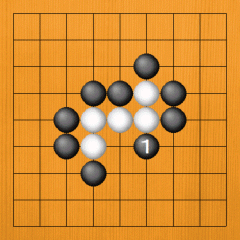
Dia. 30. If White plays at 1, Black can capture the two marked white stones. Black can also play other moves besides 2, but doing nothing would be wrong. |
|

Dia. 30 |
|
· (Application 3) Dia. 31. If Black doesn't play a move here, Black will be in trouble if White plays a move, but playing from below with White 1 is a mistake. Black flees with 2, and the marked white stones can't escape. |
|
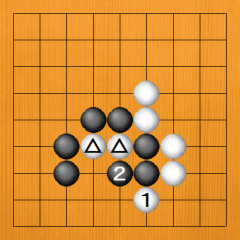
Dia. 31 |
|
Dia. 32. White plays on the side with 1, putting the marked black stones into atari. Black flees with 2. At this point, playing 3 is a mistake; unfortunately, Black can escape with 4. Not only has White let Black escape, he has lost a third stone on the inside. White 3 was played from the wrong direction. |
|
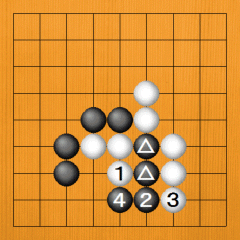
Dia. 32 |
|
Dia. 33. After White 1 and Black 2, chasing with White 3 is correct. |
|
Dia. 33
|
|
This way there are only two vacant points, at X, for Black. In contrast --> |
|
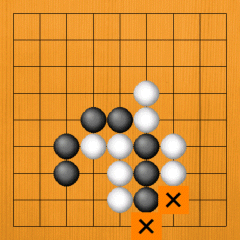
Dia. 34 |
|
Dia. 35. White has three vacant points (the X points). This way White can win the fight. |
|
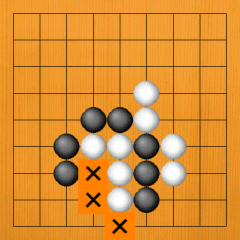
Dia. 35 |
|
Dia. 36. Even if Black tries to fill in a vacant point with 1, White plays 2, and Black doesn't have enough time. Even if he plays at 3, White takes his stones off the board with 4. |
|
Dia. 36
|
|
|
 |
|
|
|


