 |
· We think that by now you probably understand a lot about how to play Go. You probably want to play actual games as soon as possible. Initially, we recommend the 9x9 board, but before long you'll want to play on the 19x19 board. Let's study how to play on the 19x19 board.
· In the opening, you stake out your positions on the board. There are various types of openings, so let's experiment as much as we can. You don't know what your opponent will do, so it's important to be flexible. Instead of sticking to just one pattern, it's better to master various different ways of playing, and to become broad-minded.
· This does not apply just to the opening. We recommend studying everything you can and absorbing as much go knowledge as you can. That's the short cut to improvement. By playing as many games as you can, you test your own knowledge and become master of it. |
 |
[1]How to play the opening
· How to play the opening: Game 1
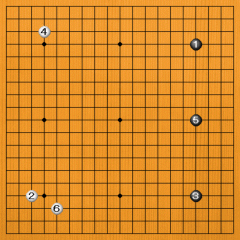
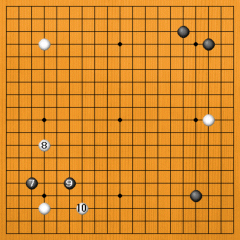
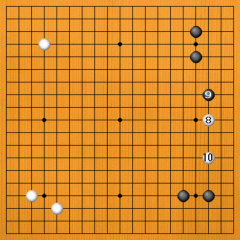
· With 1 to 4, Black and White occupy the four corners. Occupying a vacant corner before the opponent is big, so it should be given priority.
· Black 5 is linked with 1 and 3. Lining up three stones like this makes the right side Black's sphere of influence. Instead of 5 -->
|
|
Game record (1-6) |
· Dia. 1. Black could also play at 1 in the bottom left. If White 2, Black moves out into the centre with 3 and 5. If Black then plays at 7, White will probably also jump out into the centre with 8. This strategy is also possible.
· Black played on the right side with 5, so White plays a second move in the bottom left corner with 6. Instead of 6 --> |
|
Ref. dia. 1
|
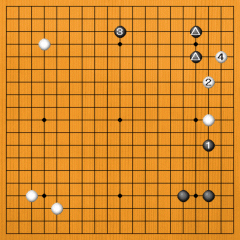
· Dia. 2. White could also play near Black's bottom right stone with 1. If Black strengthens his right-side position with 2, playing 3 at the bottom is a good strategy.
| |
Ref. dia. 2
|
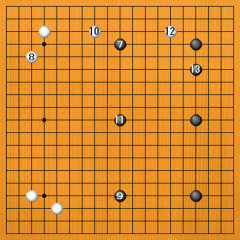
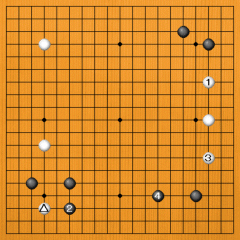
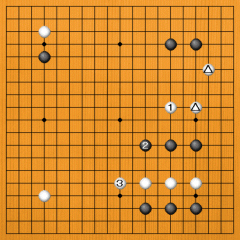
· Black plays 7 and 9 on the side of the board. His position has expanded from the right side.
· After White secures the corner territory with two moves, 4 and 8, extending along the top with White 10 is a big move. Instead of 10 --> |
|
Game record (7-13) |
|
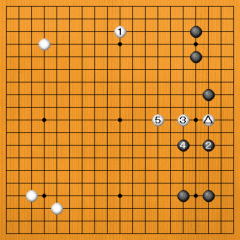
· Dia. 3. Invading Black's position with White 1 and 3 is also possible. The moves to 4 are a set pattern. Black puts pressure on White while expanding his territory in this neighbourhood.
· White follows up 10 by invading at 12. Instead of 13 --> |
|
Ref. dia. 3
|
· Dia. 4. Black could also block off the centre with 1. If White enters the corner with 2, Black blocks off the outside with 3 and 5, letting White take the corner up to 6. Black's position extending from the right side into the centre has been strengthened, so giving White the corner doesn't matter.
| |
Ref. dia. 4
|
|
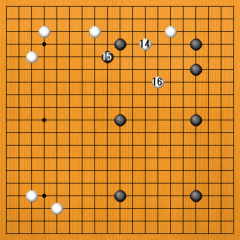
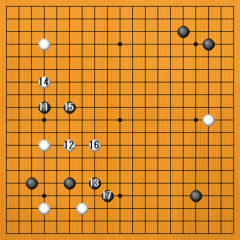
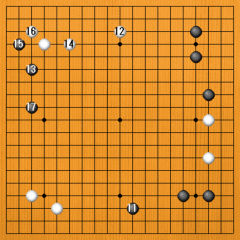
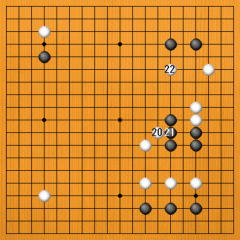
· White 14 may be narrow, but it strengthens White. Playing this move enables White to move into Black's position with 16 after Black 15. Instead of 14 --> |
|
Game record (14-16) |
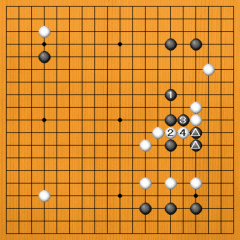
· If White worries about the corner with 1, Black may block off the centre with 2 and 4. There are various ways of playing, so we can't say which is best. The lead will be determined by how well the players play in the subsequent fighting.
· The position in Go changes with every move. It's worth studying various different ways of playing so that the move that best suits a particular situation will occur to you. |
|
Ref. dia. 5
|
· How to play the opening: Game example 2
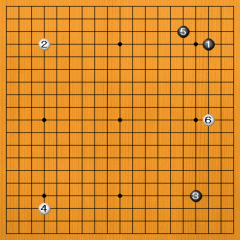
· Black and White occupy the vacant corners with 1 to 4, but instead of 4 -->
| |
Game record (1-6) |
· Playing White 1 in an area where Black already has a stone is a splendid move. In this case, White has to accept that Black may play 2 in the vacant corner. This is not bad for either side.
· With 1, 3 and 5, Black plays a lot of stones on the right side. The aim of entering the right side with 6 is to stop Black from expanding his position there any further. Instead of 6 --> |
|
Ref. dia. 1
|
· White could play his second move in the bottom left corner with 1, turning this corner into white territory. This is also a good move. The right side starts looking blackish after Black 2, but expanding his position from the bottom left along the bottom with 3 is also an excellent strategy for White.
| |
Ref. dia. 2
|
· In answer to Black 7, White attacks with 8, so Black jumps out into the centre with 9.
· Extending along the bottom with White 10 is a good move. If White omits this move --> |
|
Game record (7-10) |
· Dia. 3. If White plays 1 elsewhere, Black will play 2 at the bottom and block the escape route of the marked white stone. Things will be tough for it when it is blockaded like this. White gets more stones on the right side with 3, but Black takes up position with 4, and gets an excellent formation at the bottom. Above all else, the confined position of the marked stone is painful.
| |
Ref. dia. 3 |
|
· Black invaded the left side with 11, so the game becomes busy with 13 to 17. We have no idea what will happen later. Both sides have insecure groups, so fighting strength will decide the outcome. Instead of 11 --> |
|
Game record (11-17) |
· If Black moves into the centre with 1, the situation is easy to understand; Black is just trying to escape. However, the left side looks like becoming white territory after White 2.
· Moving out into the centre with White 16 is a good move. Instead --> |
|
Ref. dia. 4
|
|
· Dia. 5. White could also play at the bottom with 1, but Black then blocks off the centre with 2, so the two marked white stones are cramped for room. Moving quickly out into the centre, as with 16 in the game, is often a good move. |
|

Ref. dia. 5 |
· How to play the opening: Game 3
· There are various ways of playing in the corner. Here Black plays on the fifth line. The third line and the fourth line are best in the opening, but there's nothing wrong with playing on the fifth line. You are free to play wherever you like. Black also plays 3 on the fifth line.
· When Black plays 3 and 5 in succession in the corner, it's the same as if he had played 5 first, then added the stone at 3.
? White adds a second stone in the bottom left corner with 6, so Black plays a second move in the top right corner with 7. Instead of 6 -->
|
|
Game record (1-7) |
· Dia. 1. If White plays at 1, he gets the corner territory. Black will play as if to cover him with 2; up to 6, Black becomes strong on the outside. The moves to 7 form a set pattern. There are various other ways of playing, so you don't have to stick to this pattern.
| |
Ref. dia. 1
|
|
· Entering the right side with White 8 is a good move. Instead --> |
|
Game record (8-10) |
· Occupying the left side with 1 is also a good move. In that case, Black will probably play on the right side with 2. White and Black both occupy good points on the side with 3 and 4. This opening is even.
· Black 9 is a good point. The top right black position is now quite strong. Instead of 9 --> |
|
Ref. dia. 2
|
· Dia. 3. If Black plays at 1, White 2 becomes a good move. If Black extends along the top with 3, White will probably invade his corner with 4. It's unpleasant to have White come into this corner when you have gone to the trouble to investing the two marked black stones there.
· White 10 is an important move. If White doesn't play here --> |
|
Ref. dia. 3 |
· Dia. 4. If White switches elsewhere with 1, Black will attack with 2, and the marked white stone will look lonely. He can escape with 3 and 5, but while he's doing so Black's bottom area swells up with 2 and 4. The three white stones will have to keep fleeing after this, which will be painful.
| |
Ref. dia. 4 |
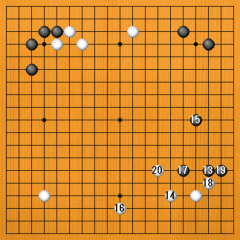
· In response to Black 13, White stakes out a position at the top with 14. When Black slides in with 15, White defends the corner with 16. White has virtually secured the corner and the left top as his territory.
· Black 17 is an important move that stabilizes the black group. Instead --> |
|
Game record (11-17) |
|
· Dia. 5. If Black switches elsewhere, playing at 1, for example, White will cause him problems by playing at 2. Black has no choice but to escape with 3, so White secures the left side with 4. Although he has fled once with 3, for the time being this black group will be insecure, so Black won't be able to relax. |
|
Ref. dia. 5
|
· How to play the opening: Game 4
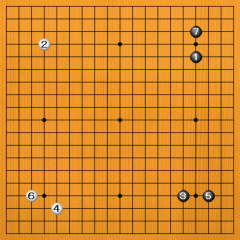
· Both sides occupy the empty corners with 1 to 4, then Black switches to the top left with 5. Instead of 5 -->
|
|

Game record (1-11) |
|
· Dia. 1. If Black plays a second move in the bottom right corner with 1, he secures the corner territory, so this is a splendid move. If White occupies the top left corner with 2, Black plays at the bottom with 3, expanding his position extending from the bottom right.
· White plays 6 in the bottom right, so White attacks with 7, making White jump out into the centre with 8. Black plays successive moves at the bottom with 9 and 11, building a territory here. Instead of 7 --> |
|
Ref. dia. 1
|
· Dia. 2. Black could also turn the bottom right corner into territory by attaching at 1. The moves to 6 are a set pattern. White gets territory on the right side.
| |
Ref. dia. 2
|
|
· White comes into the right side with 12, so Black jumps out with 13. Instead of 13 --> |
|

Game record (12-19) |
|
· If Black plays on the right side with 1, White presses down on Black with 2, and it becomes difficult for Black to do anything with the marked stone.
· Blocking Black's path with White 16 is a good move. A scrap begins with Black 17. Instead of White 16 --> |
|

Ref. dia. 3 |
· Dia. 4. If White moves out into the centre with 1, it becomes easy for Black to move into the centre with 2. White moves out together with Black with 3. The pressure has been taken off Black, but the two marked white stones have been strengthened by White 1. Most moves have some good effect, so you just have to play so as to make the most of your moves. Having strengthened himself with 1, White doesn't have to worry about his top right group for the time being. That means that he can now fight hard in the competition for territory.
| |
Ref. dia. 4 |
|
· Linking up with Black 21 in response to White 20 is an important move. Instead --> |
|
Game record (20-22) |
· If Black hastens to play at 1, White pushes through at 2 and puts him on the spot. If Black 3, White cuts off the marked black stones with 4. These stones have no escape route, so they are very likely to be captured.
· It's important not to make a mistake with connecting moves like Black 21 in the game. |
|
Ref. dia. 5 |
· How to play the opening: Game 5
· Black spends a second move defending the top right corner with 5, so White heads to the top left with 6. White didn't want to make Black defend both top corners solidly, but instead of 6 -->
|
|

Game record (1-12) |
· Dia. 1. There's nothing wrong with playing at the bottom with 1. That permits Black to defend with 2, but White plays on the right side at 3, increasing the number of his bases. This way of playing is quite feasible.
· Black turns the top left into territory with 7 to 11, and White occupies the centre top up to 12. The moves here are a set pattern, but instead of 7 there are various other ways for Black to play. |
|
Ref. dia. 1
|
· For example, Black could attack from the right with 1, in which case White will jump out with 2. The sequence to 5, in which both sides move out, is often seen.
| |
Ref. dia. 2
|
|
· Black occupies the right side with 13 and 15. Instead of 13 --> |
|
Game record (13-20) |
· Dia. 3. Playing Black 1 at the bottom is also conceivable. If White defends the corner with 2 and 4, Black stabilizes himself at the bottom with 3 and 5, and this exchange is concluded. Next, expanding towards the top with White 6 will be big.
· Instead of Black 15 --> |
|
Ref. dia. 3
|
· Dia. 4. Black could also play the set pattern of 1 and 3. Playing White 4 at the bottom looks big now.
· Occupying the bottom with White 16 is a good move. Instead --> |
|
Ref. dia. 4
|
|
· Dia. 5. White 1 also looks good, but after the same sequence from 2 to 5, Black 6 at the bottom becomes an ideal point. White played 1 and 5 with the intention of expanding the bottom, but when Black invades at 6, White's camp looks like being laid to waste.
· Blocking Black's advance with 20 is a good move: White's bottom area has swelled up. Instead of 20 --> |
|
Ref. dia. 5
|
|
· Dia. 6. Defending the corner with White 1 would also be big, but Black's right-side position becomes big when Black jumps out at 2, and the potential of White's bottom area is limited. A point like this that is good for both sides must not be missed. |
|
Ref. dia. 6
|
|
|


