 |
[2]Examples of actual games
Actual games: Game 1
· Here we show an actual game. It's a peaceful game without much fighting. Let's look at how Black and White go about increasing their territories.
· Figure 1 (1-4)
· From 1 to 4, the players are playing on the third line from the edge. Both sides occupy the corners: this is a basic way of playing. |
|
Figure 1
|
|
· Dia. 1. Black 1 and 3 are the same, but playing low moves on the first and second lines like 2 and 4 is uninteresting. Black gets a magnificent position, but in contrast White's position is biased towards a small, low area. |
|
Dia. 1
|
· Figure 2 (5-9)
· Black expands his position with 5. White 6 links up the white stones above and below and protects his position. |
|
Figure 2
|
|
· If, instead of 6, White plays 1 or another move in Dia. 2, jumping in with Black 2 becomes a good move. White's left-side territory is broken up. |
|
Dia. 2
|
· Figure 3 (10-15)
· White 10 expands the bottom black territory while reducing Black's territory. Blocking White's path with Black 11 is natural. In response to White 14, blocking with Black 15 is a good move. |
|
Figure 3
|
· Figure 4 (16-19)
· White 16 and 18 are sente for White ('sente' refers to a move that the opponent is forced to answer). If White omits 16 --> |
|
Figure 4
|
· Dia. 3. On the contrary, Black will play at 1. This is sente for Black. Since it's sente for both sides, it's profitable to play the move as soon as possible.
· Linking up Black's stones with 19 is essential. If Black omits this move --> |
|
Dia. 3
|
|
· Dia. 4. White will cut at 1 and put him on the spot. Even if Black escapes with 2, he is captured with 3. You can play in a relaxed way if you are able to block off the first line properly, so please get used to it as quickly as you can. |
|
Dia. 4
|
· Figure 5 (20-24)
· Black 21 and 23 are sente for Black. If White omits 24 --> |
|
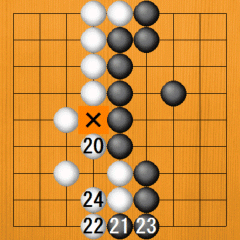
Figure 5 |
· Dia. 5. Black will cut at 1, putting White on the spot. Even if White escapes with the two stones above, Black will capture the stone below with 3. It's easy for incidents to happen on the edge of the board, so you have to play carefully.
· In the end, the X point is left. This is a dame or worthless point. The player whose turn it is fills in this point and the game ends. |
|
Dia. 5
|
· Figure 6
· Black fills in the dame point with 1 and the game ends. Black has 30 points of territory and White has 26, so Black wins by four points. |
|
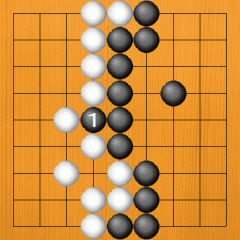
Figure 6 |
Actual game example: Game 2
· Figure (1-5)
· Black plays next to the centre point with 1. White plays near him with 2, so Black attaches with 3. After 4, Black cuts with 5, starting a hand-to-hand fight.
· When the stones come into contact, it's easy for an incident to occur. It's dangerous for you, but the opponent is probably also surprised. It's hard to say who will do better in the fight. |
|
Figure 1
|
· Figure 2 (6-10)
· White extends first with 6. In answer to Black 7, White escapes with 8.
· Black links up 7 and the marked stone with 9. This is an important move. Without it --> |
|
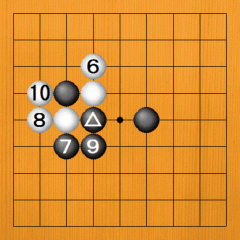
Figure 2 |
|
· Dia. 1. When Black escapes with 2, White captures the marked black stone in a ladder with 3.
· White 10 is an essential point. If White forgets to play here --> |
|
Dia. 1 |
|
· Dia. 2. Black captures two white stones with 1. Even if White tries to escape with 2, Black catches him with 3. Even if White plays at 4, Black captures first with 5. |
|
Dia. 2
|
· Figure 3 (11-15)
· With 11, it feels as if Black has taken control of the right side. White doesn't make an unreasonable attempt to come into the right side after this.
· White enters the bottom left with 12, but if Black can hold the invasion to this degree with 13 and 15, the result will be good enough for him. |
|
Figure 3
|
· Figure 4 (16-24)
· The border at the top is settled with White 16 to Black 19. The bottom is also mainly settled with White 20 to 24. The end of the game is drawing near. |
|
Figure 4
|
· Figure 5 (25-33)
· We now enter the final endgame stage. Black blocks off the centre with 25. White 26 and 28 are sente.
· Black 31 is also sente. If White doesn't play 32 --> |
|
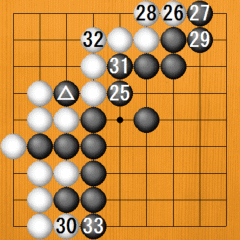
Figure 5 |
|
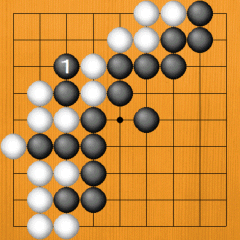
Dia. 3. He will be in trouble when Black plays out with 1. |
|
Dia. 3 |
· Dia. 4. Even if White connects at 1, Black captures him on a large scale with 2 to 6. This would be terrible.
· The game ends with Black 33. There are no dame points. The marked black stone is placed in Black's territory and the respective territories are counted. |
|
Dia. 4
|
· Figure 6
· The marked black stone has filled in a point in Black's territory.
· Black's territory is 31 points. White's is 17, so Black wins by 14 points. Black's strategy of expanding on a large scale has succeeded. |
|
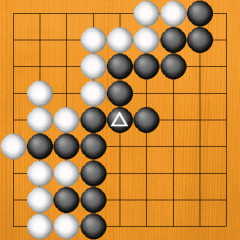
Figure 6 |
Actual game example: Game 3
· Figure 1 (1-5)
· In this game, the stones become intertwined with each other, so we see a complicated development. In actual play, this kind of game is most common. Let's follow the course of this game and get used to the fighting.
· Black strengthens the bottom right with 1 and 3. The left side looks like becoming big after White 2 and 4.
· Therefore, Black plunges in at 5. If he goes all out here and reduces White's territory, he will have a promising game. |
|
Figure 1
|
· Figure 2 (6-9)
· White limits Black's right-side position with 6 and 8.
· Black expands from the marked stone with 9. He looks like getting a small but solid territory. |
|
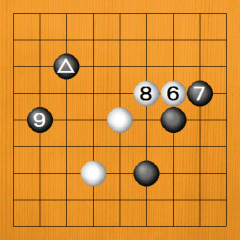
Figure 2 |
· Figure 3 (10-16)
· White 10 blocks off the top right.
· White now tries to settle the top left border with 12.
· Answering Black 13 with White 14 is natural. Instead --> |
|
Figure 3
|
|
· Dia. 1. If White hastens to play at 1, Black plays through with 2 and splits the top left white position into two, causing White problems.
· Black blocks with 15, securing a territory in the top left. |
|
Dia. 1
|
· Figure 4 (16-21)
· White 16 is captured by Black 17 and 19. As compensation, White plays 20 and in the future White A will be sente. |
|
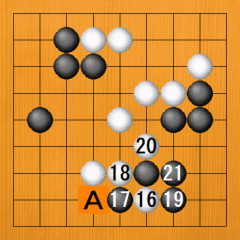
Figure 4 |
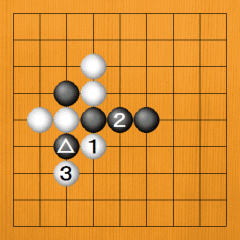
· Figure 5 (22-27)
· After White 22, White answers Black 23 by escaping with 24. Instead of this move --> |
|
Figure 5
|
|
· Dia. 2. If White plays at 1, Black captures a white stone with 2. |
|
Dia. 2
|
· Figure 6 (28-36)
· When Black plays at 31, White has to link up with 32. If he omits this move --> |
|
Figure 6
|
· Dia. 3. Black cuts at 1, and White 2 is too late. Black captures two stones with 3.
· White 36 is necessary in the same way. |
|
Dia. 3
|
|
· Dia. 4. If Black cuts at 1, White's two stones are captured. |
|
Dia. 4
|
|
· Figure 7 (37-51)
· Black 43 is necessary. Without it --> |
|
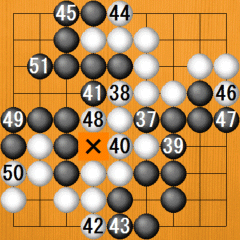
Figure 7 |
|
· Dia. 5. Because of White 1, the point of Black 2 becomes a false eye, so Black 2 becomes necessary. The point that Black should have got at 2 has disappeared, so Black has suffered a loss.
· After Black 51, there are no more points. All that remains is to fill in the X point. |
|
Dia. 5
|
· Figure 8
· The game ends with White 1. Before counting, the white stone that was captured at A is placed inside White's territory (the marked stone).
· Black has ten points in the bottom right and eight points in the top left, for a total of 18 points. White has seven points in the top right and four points in the bottom left, for a total of 11 points. Black wins by seven points. |
|
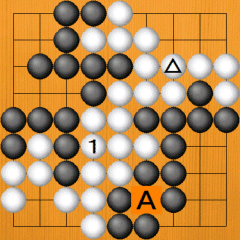
Figure 8 |
 |
About komi
· The side that plays first, either on a 9x9 board or a 19x19 board, has an advantage. If the players are of the same strength, it makes a big difference whether you have the first move with Black or whether you take White. For that reason, White, who plays second, is usually given a handicap.
· In the case of the 19x19 board, Black gives White a handicap of 6.5 points. This handicap is called a komi; in short, Black gives White a komi of 6.5 points. There's a reason for the half point. If, for example, Black was six points ahead on the board, then, since 6-6 = 0, the result would be a draw. If Black is seven points ahead on the board, then 7-6.5 = 0.5, so Black would win by half a point. If Black is six points ahead on the board, then White will win by half a point. The half point in the komi eliminates draws, so every game played with a komi ends with a win for one side.
· In the case of the 9x9 board, it's hard to say what the most appropriate handicap is. In particular, in the case of beginners, a small difference in knowledge may cause a big difference in actual strength. When playing someone for the first time, taking it in turns to play Black is a good idea. If the results are fairly even, then setting a komi of 4.5 or 5.5 points would be best. If one side keeps on winning, then that player could take White every game.
· The short cut to getting stronger is to experience a lot of actual games. Don't worry too much about winning or losing, but play lightheartedly. The more people there are whom you can play fun games with, the better your chances are of improving. You should value your Go friends. |
|
|


