 |
[3]Contact fights on the second line
· The second line is close to the edge of the board, so various incidents occur on it. You'll find it very useful if you get to understand the features of the second line and take advantage of them. Let's keep studying!
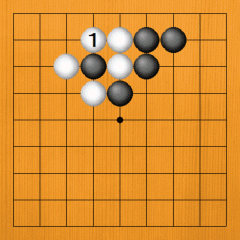
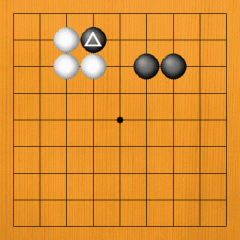
· Dia. 1. Black can capture the marked white stone. Please think about how he should play before looking at the next diagram. |
 |
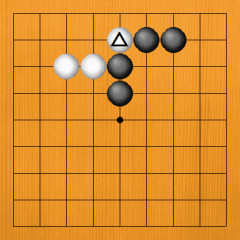
Dia. 1 |
|
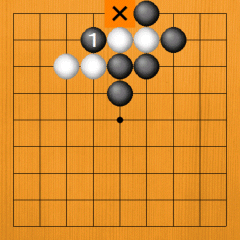
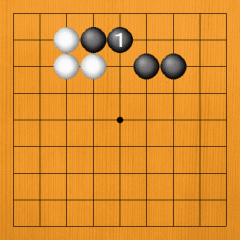
· Dia. 2. If Black 1, White links up with 2. This is out of the question. |
|
Dia. 2
|
· Dia. 3. Black captures with 1. If White 2, Black takes the stone off the board. Instead of 2 -->
(Please look at the next diagram) |
|
Dia. 3
|
|
· Dia. 4. Even if White flees with 1, he runs into the edge, so this is a dead end. White can't escape after Black 2. This is one of the characteristics of the second line: when you are chased from above, there is no escape route. |
|
Dia. 4
|
|
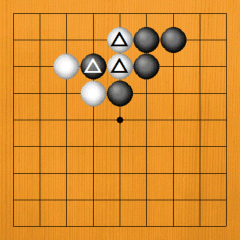
· Dia. 5. This time there are two marked white stones. Can Black capture them? |
|

Dia. 5 |
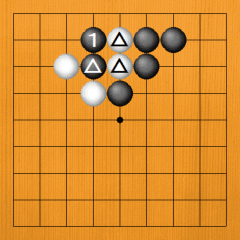
· Dia. 6. Black can capture them with 1. For White to flee to the X point is futile.
Next --> |
|
Dia. 6 |
|
· Dia. 7. If White 1, Black captures with 2. Stones on the second line immediately lose their escape route, so you have to be careful. |
|
Dia. 7
|
(Problem 1) Black to play
· The stones are intertwined in a complicated way, but the principle is simple. What is the relationship between the marked black stone and the marked white stones? First, what happens with Black to play? Also think about the position with White to play. |
|
Problem 1 |
|
· Dia. 1. Pulling out the marked black stone with 1 is good enough. Black can now capture the two marked white stones. |
|
Dia. 1 |
· Dia. 2. Even if White flees with 1, he can't escape after Black 2. Instead of White 1 -->
(Please look at the next diagram) |
|
Dia. 2
|
|
· Playing from the outside with White 1 doesn't help: Black captures with 2. Attack and defence on the second line immediately leads to a favourable or unfavourable result, so it's important to get used to it so you can handle it. |
|
Dia. 3
|
|
· Dia. 4 (White to play) If it's White's turn, he solves the problem by capturing a black stone with 1. You can see how different the result is depending on whose turn is it. |
|
Dia. 4 |
(Problem 2) White to play
· The theme is still the second line. What should White do? |
|
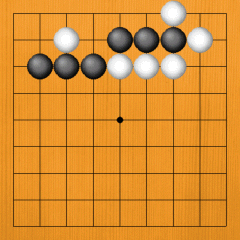
Problem 2 |
|
· Dia. 1. Cutting with White 1 is correct. Black may resist with 2, but White corners him first with 3. White can capture the three marked black stones. |
|
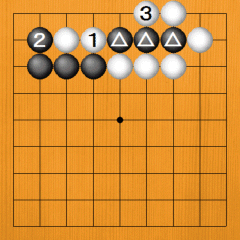
Dia. 1 |
|
· Dia. 2. If White plays at 1, Black links up with 2, so the white stone in the top left is left in the lurch. |
|
Dia. 2
|
|
· Dia. 3 (Black to play). If it is Black's turn, he links up with 1. This rescues the three marked black stones and enables Black to capture the marked white stone. Cutting or connecting on the second line leads to a big difference, so you must try not to make mistakes. |
|
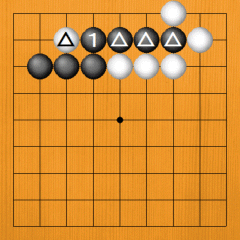
Dia. 3 |
(Problem 3) Black to play
· The marked black stone is in trouble. How can Black rescue it? |
|
Problem 3 |
|
· Dia. 1. If Black flees with 1, he links up to his other stones. He is now safe. |
|
Dia. 1 |
|
· Dia. 2. Black 1 does not secure a connection. White captures the marked black stone with 2. If Black 3, White captures at 4. |
|

Dia. 2 |
|
· Dia. 3. If Black flees with 1, he runs into the edge of the board. After White 2, Black has nowhere to run. If Black cuts at 3, White captures with 4. |
|
Dia. 3
|
|
|


