 |
[4]Endgame on the first line
· The first line, the edge of the Go board, has some special properties. If you don't understand them, you may suffer some unexpected losses when settling the borders between groups.
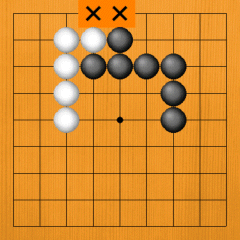
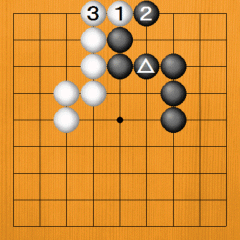
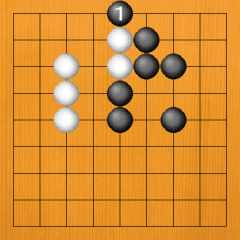
· Dia. 1. The focus is on the top. What is the situation with the X points? Think about it from both Black's and White's point of view. |
 |
Dia. 1 |
|
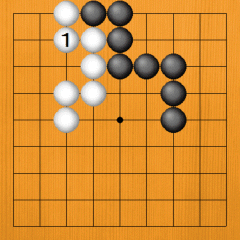
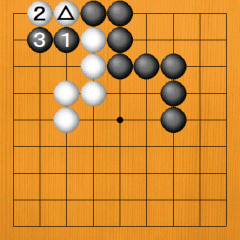
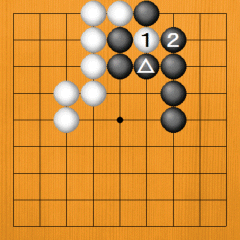
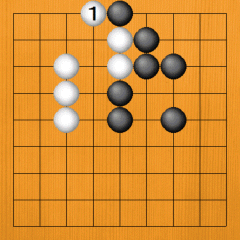
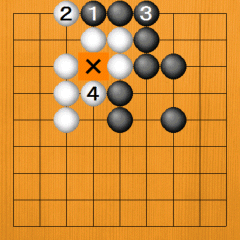
Dia. 2. First, Black's turn. Black increases his own territory with 1 while reducing White's. If White 2, he must not forget to connect at 3. Forgetting would be awful. |
|
Dia. 2
|
|
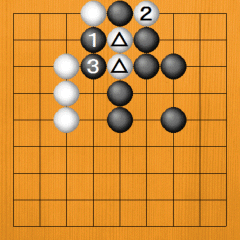
· Dia. 3. Black will lose a stone when White plays 1. He must block White with 2, so he has suffered quite a loss. |
|
Dia. 3
|
|
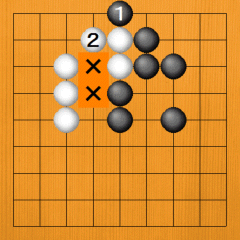
· Dia. 4. Similarly, White will play at 1. If Black 2, White plays 3, and the border has been settled. |
|
Dia. 4
|
|
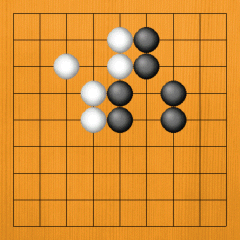
· Dia. 5. White's shape has been changed here. When the shape changes, the result changes. First, please think about what Black would play. |
|
Dia. 5 |
|
· Dia. 6. Black 1 is the same as before. If White 2, Black connects at 3. At this point, White has to be careful. |
|
Dia. 6
|
|
· Dia. 7. White must make sure he links up with 1. This way White is safe, but if he omits 1, he gives Black a good chance. |
|
Dia. 7 |
|
· Dia. 8. If Black cuts at 1, he captures the marked white stone. Even if White flees with 2, he can't escape after Black 3. Some of the territory that White went to the trouble of building has disappeared. |
|
Dia. 8 |
· Dia. 9. Well, what if it's White's turn? If White 1, Black blocks with 2. White 3 is necessary, but Black's position is safe as it is even if he does nothing. The presence of the marked black stone makes it possible for Black to switch elsewhere. Next -->
(Please go to the next diagram) |
|
Dia. 9 |
|
· Dia. 10. Even if White cuts with 1, Black captures with 2. When Black has the marked stone in place, he can switch elsewhere. |
|
Dia. 10 |
|
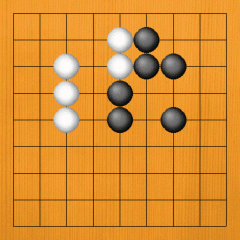
· Dia. 11. The focus is on the border at the top. Again, please think about Black's turn and White's turn. This is a tricky shape, so you have to be careful. |
|
Dia. 11 |
· Dia. 12. First, Black's turn. If Black 1, White blocks with 2. Black must not forget to connect with 3. White 4 is also necessary. If White doesn't play 4 -->
(Please go to the next diagram) |
|
Dia. 12
|
|
· Dia. 13. If White switches elsewhere, Black 1 puts him on the spot. If White links up with 2, Black captures a stone with 3. |
|
Dia. 13
|
· Dia. 14. If White plays here first, the moves to 4 will follow. If Black omits 4 -->
(Please go to the next diagram) |
|
Dia. 14
|
|
· Dia. 15. The cut of White 1 will put him on the spot. If Black 2, White cuts with 3. |
|
Dia. 15
|
|
· Dia. 16. Once again, the shape has changed a little. First, think about what Black will play. |
|
Dia. 16 |
|
· Dia. 17. If it is his turn, Black will play at 1. White has to be careful about his answer. The shape may resemble some we have already seen, but a subtle change makes a big difference. |
|
Dia. 17 |
|
· Dia. 18. White 1 is a mistake. Black will now let fly with a tesuji. |
|
Dia. 18 |
· Dia. 19. Black cuts at 1, and White is in big trouble. If he captures a stone with 2, Black plays 3 and captures his marked stones.
Next --> |
|
Dia. 19 |
· Dia. 20. If White links up with 1, Black plays 2 and captures all the stones. If White flees along the edge with 3 and 5, Black chases with 4 and 6, and all the white stones perish. Instead of 1 -->
(Please go to the next diagram) |
|
Dia. 20
|
· Dia. 21. If White 1, Black captures two stones with 2. Next -->
(Please go to the next diagram) |
|
Dia. 21
|
|
· Dia. 22. White can recapture a stone with 1, but Black blocks off the corner with 2. Black has taken a lot of profit. |
|
Dia. 22
|
|
· Dia. 23. If White saves the two stones with 2, Black captures the stone on the edge with 3. White's top left corner territory has been reduced. |
|
Dia. 23
|
|
· Dia. 24. When White doesn't have a stone on one of the X points, he must flee sideways with 2 in response to Black 1. This way, nothing bad will happen to him. |
|
Dia. 24 |
· Dia. 25. Black can go in only as far as 1, so White can block his way with 2. Connecting with Black 3 is necessary, so White plays 4 and gets a point of territory at the X point.
· All kinds of variations occur on the first line, so it's a good idea to understand its characteristics as soon as you can. At first, it may be confusing, but you'll get used to it as you play more and more actual games. There's no need to worry about mistakes. |
|
Dia. 25 |
|
|


