 |
[3]When the opponent lives and dies inside your position
(a) Living and dying
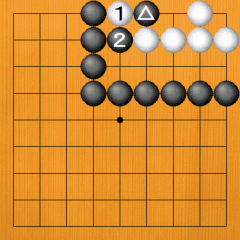
· Even after you've gone to the trouble of building a position, the opponent sometimes invades it. There's no problem if you capture it, but the opponent may make two eyes and live. In Dia. 56, Black has enclosed the top right, but White is alive inside his position, so Black's territory here is zero. White's invasion has taken away all the territory, |
|
Dia. 56 |
|
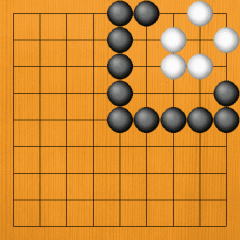
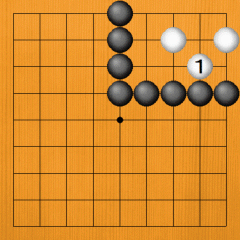
· Dia. 57. How about the white group here? The result changes depending on whose turn it is. |
|
Dia. 57 |
|
First of all, White can live by playing 1 in Dia. 58. |
|
Dia. 58 |
|
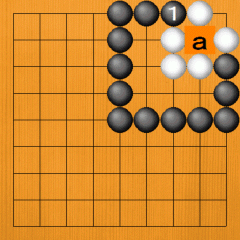
However, things are different if it is Black's turn to play. If Black plays at 1 in Dia. 59, White plays 2 and makes two eyes, but Black 1 is a mistake. |
|
Dia. 59
|
|
Dia. 60. Jumping to Black 1 is a good move. White is no longer able to make two eyes. Next --> |
|
Dia. 60 |
|
Dia. 61. Even if White plays at 1, Black links up with 2. |
|
Dia. 61
|
|
Also, if White tries to stop Black from linking up with 1 in Dia. 62, Black plays 2 and captures White 1. Once Black plays the marked stone, White can no longer live. |
|
Dia. 62 |
|
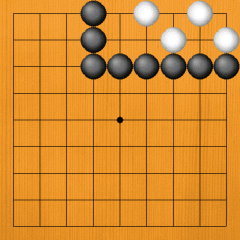
Dia. 63. White has made two eyes and lived inside Black's encircling net. |
|
Dia. 63 |
|
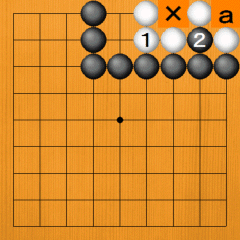
Dia. 64. Even if Black plays at 1, White can live with 2. Do you understand the reason? |
|
Dia. 64
|
|
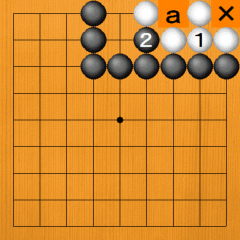
If, for example, White doesn't play 2, Black plays at 1 in Dia. 65, and the 'a' point becomes a false eye. |
|
Dia. 65 |
|
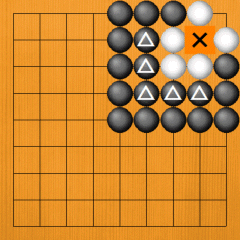
Dia. 66. If one places the marked black stones around White, it becomes clear that the X point is a false eye. If Black plays X next, he captures the three white stones; White can't make a second eye there. |
|
Dia. 66 |
|
· Well, let's look at Dia. 67. What happens when White has no stone at the X point? |
|
Dia. 67 |
|
Dia. 68. If White plays at 1, his group lives, but please think about Dia. 67 from Black's point of view. |
|
Dia. 68 |
|
Dia. 69. When Black plays 1, White's second eye crumbles. Even if White plays 2, Black escapes with 3, so he can't capture Black 1. The problem is: What happens to the X point? |
|
Dia. 69 |
|
Dia. 70. When Black gets the marked stone in place, the X point becomes a false eye. If White plays at 1, Black pushes in at 2, making this a false eye. If instead White plays 1 at 2, Black plays 1, again making it a false eye. Life and death are decided by whether or not you can make two eyes. |
|
Dia. 70 |
|
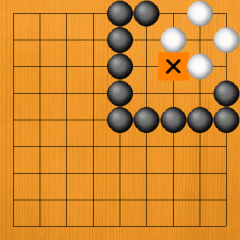
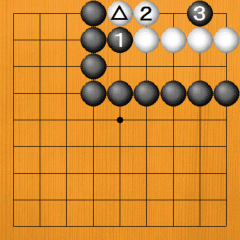
· How about Dia. 71? In this case, also, the group lives if it is White's turn and dies if it is Black's turn. |
|
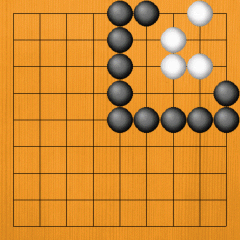
Dia. 71 |
|
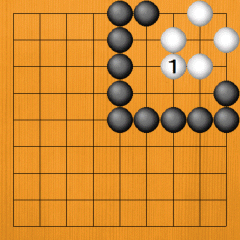
Dia. 72. If it is White's turn, he plays 1 1 and makes sure of two eyes. White is alive. |
|
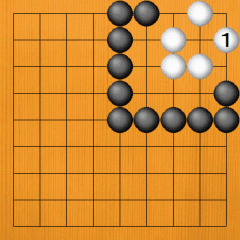
Dia. 72 |
|
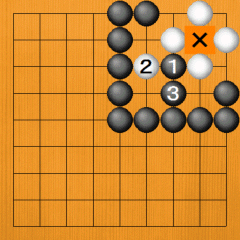
Dia. 73. If it is Black's turn, he plays at 1, and White is reduced to one eye. Even if White plays at 2, capturing the black stone, he can't build two separate eyes. |
|
Dia. 73
|
(b) When a group is already dead
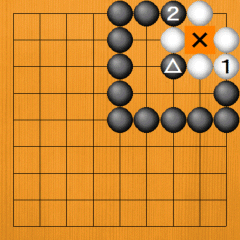
· Dia. 74. Whatever White plays, his group is dead. Let's consider various white moves. |
|
Dia. 74 |
|
Dia. 75. Even if White makes one eye in the corner with 1, he dies after Black 2, as we explained above. |
|
Dia. 75
|
|
Dia. 76. Even if White expands his position with 1, he gets only one eye when Black plays in the centre with 2. |
|
Dia. 76
|
|
Dia. 77. How about expanding his position one more step with White 1? |
|
Dia. 77 |
|
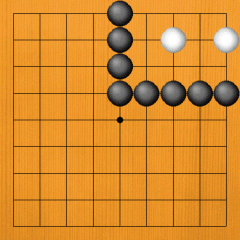
Dia. 78. If Black plays at 1, White must save the marked stone. If he links up with 2, Black kills him with 3. Therefore, the white group in Dia. 74 is already dead as it stands. |
|
Dia. 78 |
|
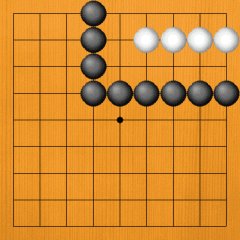
Dia. 79. How about this group? White is already dead. |
|
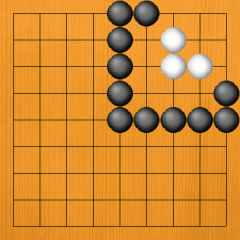
Dia. 79 |
|
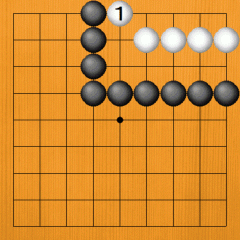
· Dia. 80. Even if White plays at 1, Black plays at 2, and White can't make two separate eyes. Therefore, this white group is already dead even if White doesn't do anything. |
|
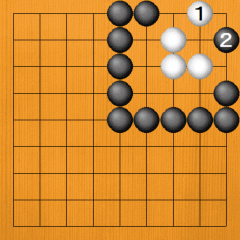
Dia. 80 |
|
· Dia. 81. White has just two stones. If White wants to try to live --> |
|
Dia. 81 |
|
Dia. 82. He needs to make successive moves at 1 and 2. However, you take turns to play in Go, so this won't happen. |
|
Dia. 82 |
|
Dia. 83. If White 1, Black kills him with 2. Even if White continues with 3, Black can just ignore him. The white group in Dia. 81 is captured as it is. .To know whether a group is captured or whether it has scope to live, you have to understand the ensuing variations. This analysis is called 'reading', and it is an important element in Go. While you are thinking about the next move, you think , 'If the opponent plays here, I'll play here.' |
|
Dia. 83
|
· (Application 2) Well, let's tackle a problem.
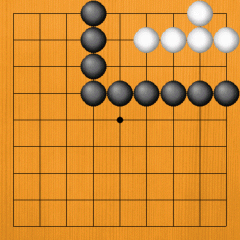
· Dia. 84. What is the status of the white group? First of all, let's think about whether it can live if it is White's turn. |
|
Dia. 84 |
|
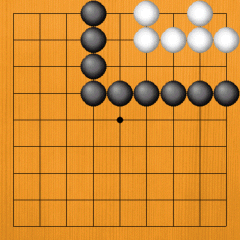
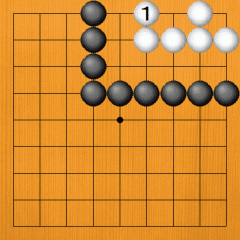
· Dia. 85. If White plays at 1, the X point in the corner is a real eye, but when Black plays at 2 the 'a' point becomes a false eye. |
|
Dia. 85 |
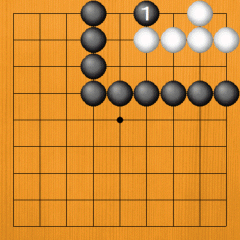
Dia. 86. If instead White plays first at 1, Black pushes in at 2, and neither the X point nor 'a' becomes a real eye. White has no good alternatives to the two moves we have looked at, so there is no way that the white group in Dia. 84 can live.
At the end of the game, Black will take all these white stones off the board and place them in the opponent's territory. Even if you haven't filled in all the adjacent points, a dead group is a dead group, so in effect it has been captured. |
|
Dia. 86 |
|
|


