 |
| While we are playing a game, we may be puzzled by some special shapes that come up. If you know that you take turns to play, that the side with more territory wins, that you can capture enemy stones, this is more or less enough to play a game of Go. However, there are some special shapes that we will study. |
 |
[1]Ko
(a) The necessity for a rule
· As you know, when you surround a stone on its four vertical and horizontal points, you can take it off the board. In Dia. 1, Black can capture the white stone with one more move. |
|
Dia. 1 |
|
Of course, Black 1 in Dia. 2 is the move. |
|
Dia. 2 |
|
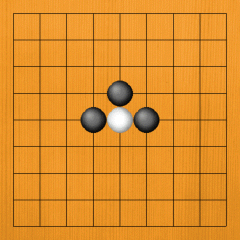
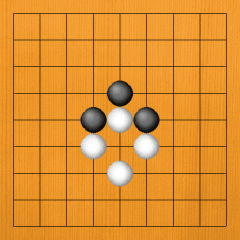
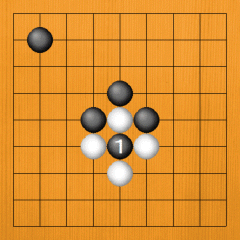
Well, please take a look at Dia. 3. What is going on in this shape? Can Black capture the marked white stone? |
|

Dia. 3 |
|
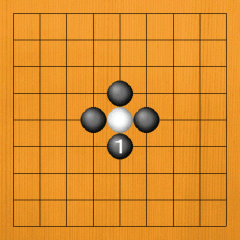
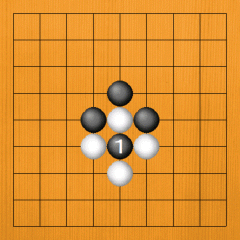
Dia. 4. As you know, Black can capture the stone with 1. |
|

Dia. 4 |
|
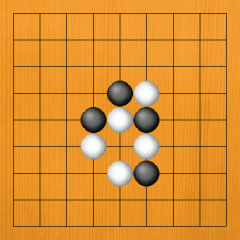
Dia. 5 shows the shape after this capture has been made. It's a strange shape. Now it's White's turn to play. |
|
Dia. 5 |
|
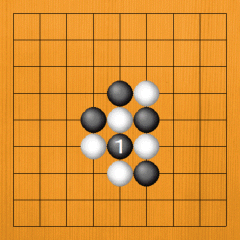
If White plays, he can recapture the black stone as in Dia. 6. |
|
Dia. 6 |
|
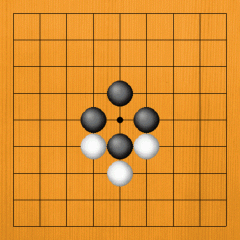
However, the shape after the capture is shown in Dia. 7. The position has reverted to the same shape as in Dia. 3. |
|
Dia. 7 |
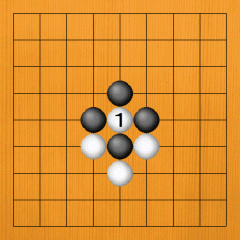
In Dia. 8, it's Black's turn to play. He can again capture a white stone with 1. Since the players play in turn, this capture and recapture can continue endlessly. Therefore, there is a rule for this special shape. The rule is that you can't recapture immediately after the opponent has captured.
· Let's have another look at Dia. 8. Let's assume that Black has captured with 1 for the first time. White cannot recapture this stone immediately; he has to play a move elsewhere. That's the ko rule. |
|
Dia. 8 |
|
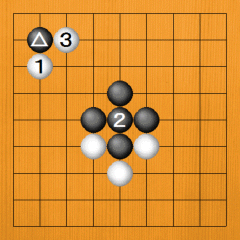
Therefore, White will play 1 at another point in Dia. 9. If Black also plays 2 at another point, White can now recapture the stone with 3. |
|
Dia. 9
|
|
Dia. 10. However, when White plays elsewhere with 1, Black can connect at 2, so it is no longer a ko. If this happens, it can't be helped: White has no choice but to play elsewhere with 3. |
|
Dia. 10
|
(b) Examples of kos
·Let's look at kos in more detail. The shape in Dia. 11 is a complicated one. |
|
Dia. 11 |
|
Dia. 12. If Black plays first, he can capture the ko with 1. |
|
Dia. 12 |
|
Dia. 13 shows the shape after Black has captured. White can't immediately recapture the ko, so he must play somewhere else with 1. If Black also plays elsewhere with 2, White can now recapture with 3. |
|
Dia. 13
|
|
However, if in response to White 1 Black captures at 2, the ko is over. Black gets a splendid shape in the centre. |
|
Dia. 14
|
(c) Ko threats
· The act of playing elsewhere in a ko fight is called a ko threat. If Black plays in Dia. 15, he can capture the marked white stone. |
|

Dia. 15 |
|
Dia. 16 shows this capture. White can't immediately recapture. |
|
Dia. 16 |
|
White therefore plays elsewhere with 1 in Dia. 17. If Black answers at 2, White retakes the ko with 3. This White 1 is a ko threat. |
|
Dia. 17
|
|
· However, Black might ignore the ko threat of White 1 and connect at 2 in Dia. 18. This ends the ko. Next, White plays at 3 and takes control of the marked black stone. |
|
Dia. 18 |
|
The marked black stone in Dia. 18 is small, but if instead Black has four stones as in Dia. 19, the ko threat is a little bigger. If White plays 1 and 3 in a row, the four black stones can't escape. |
|
Dia. 19
|
|
Dia. 20. If Black tries to escape with 1, White captures him with 2. Playing Black 3 next is futile. White captures all the stones with 4. |
|
Dia. 20
|
|
|


