 |
| There are various techniques used in playing Go. In particular, if you can do something clever when the stones come into contact, you will get an advantage. These techniques for hand-to-hand fighting are called tesujis. Tesujis can be applied in various situations in actual play. The more tesujis you know, the easier you will find it to deal with various fighting situations and the more you will progress. |
 |
[1]Nets
(a) You can't catch stones simply by chasing them.
· Once you have learned Go, capturing enemy stones is really enjoyable. That's not a bad thing, but if you recklessly pursue enemy stones to try to capture them, things won't work out well. Rather than chasing, it's better to lie in wait; this way, the opponent won't be able to find an escape route.
(b) Lying in wait is favourable
· There's a tesuji that enables you to lie in wait for the opponent and seize hold of him. It's called the geta, translated as 'net'. It's very convenient, so it's worth learning. |
(Problem 1)
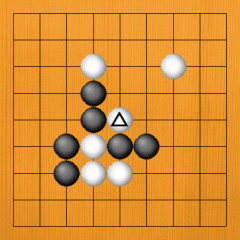
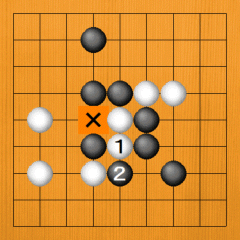
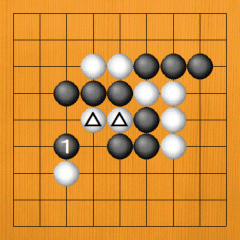
· Black to play. He would like to capture the marked white stone. Capturing this stone will give Black a very favourable result, but simply chasing it won't work. You need a tesuji. In an actual game, you get only one chance to find the right answer, but when you are studying, it doesn't matter how many mistakes you make. Can you find the tesuji? |
|
Problem 1 |
|
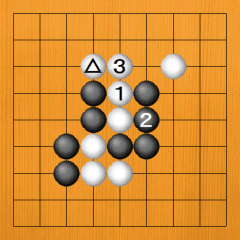
· Dia. 1. If Black plays 1 and White doesn't flee, Black will capture it with 3. However --> |
|
Dia. 1
|
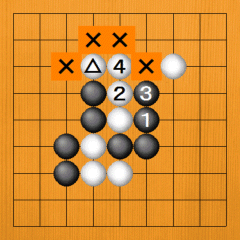
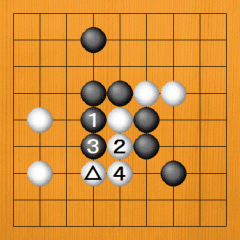
Dia. 2. White will flee with 2. Black may keep chasing with R, but White links up to his marked stone with 4, so these white stones are now strong. To capture them, Black would have to play on the four X points, which is already impossible. Well, instead of 3 -->
(Go to the next diagram) |
|
Dia. 2 |
|
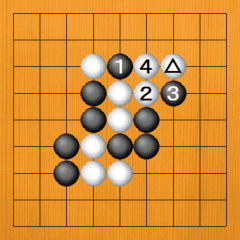
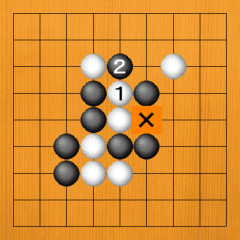
· Dia. 3. What if Black plays at 1? White naturally flees with 2. If next Black 3, White plays 4, linking up to the marked stone. This makes White strong. Black can't catch White. |
|
Dia. 3 |
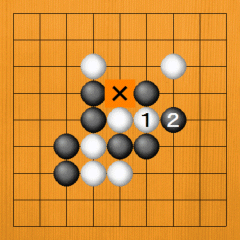
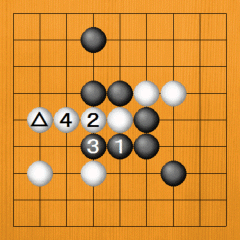
· Dia. 4. This time let's try chasing with Black 1. If 2, Black keeps chasing with 3 and 5. After White 6, it's easy to see that Black can't catch White. Instead of 5 -->
(Go to the next diagram) |
|
Dia. 4
|
|
· Dia. 5. Even if Black chases with 1, White links up with 2, so White can't be caught. |
|
Dia. 5
|
|
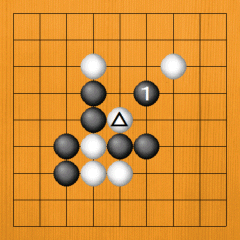
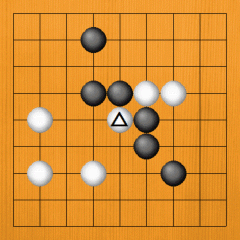
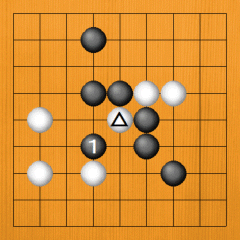
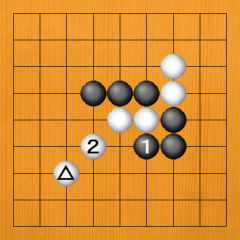
· Dia. 6 (correct answer). Directly chasing the marked white stone doesn't work. Lying in wait with Black 1 is a clever move. This is the tesuji called a geta or a net. You cast a net and lie in wait for the opponent. If White tries to pull out his marked stone, he will find it has been netted by Black 1. |
|
Dia. 6 |
|
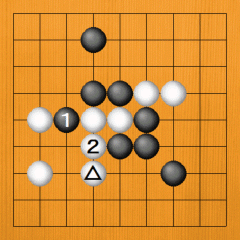
· Dia. 7. When White flees with 1, Black must not chase with 2: the tesuji goes to waste. White 3 links up with the marked stone, making it impossible to catch these stones. Black 2 is a mistake. |
|
Dia. 7 |
|
· Dia. 8. When White flees with 1, blocking the exit with Black 2 is clever. White can't escape. Playing on the X point is clearly futile for White. |
|
Dia. 8 |
|
· Dia. 9. If White 1, Black captures with 2, of course. |
|
Dia. 9
|
|
· Dia. 10. When White gets caught in this net, he is helpless. Fleeing in the other direction with 1 doesn't work either. Black blocks his escape route with 2 and captures the two white stones. Playing on the X point is also no good. |
|
Dia. 10 |
(Problem 2)
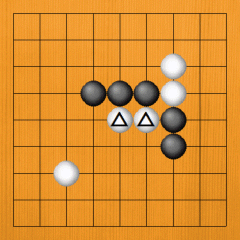
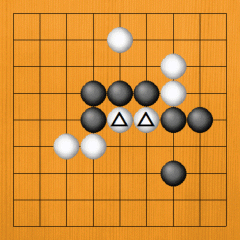
· The shape is different. Can Black capture the marked white stone? Simply chasing it doesn't work. A tesuji is necessary. |
|
Problem 2 |
|
· Dia. 1. Chasing with 1 doesn't work. White links up to the marked stone. |
|
Dia. 1 |
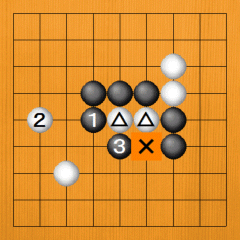
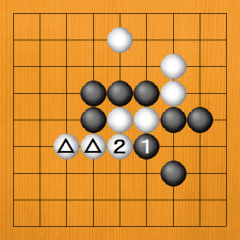
· Dia. 2. Chasing from the other side with 1 doesn't work any better. White escapes with 2. If Black 3, White 4 links up to the marked stone. Instead of Black 3 -->
(Go to the next diagram) |
|
Dia. 2 |
|
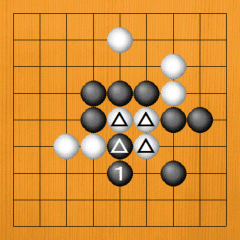
· Dia. 3. Chasing with Black 1 lets White escape with 2, linking up with the marked white stone. |
|
Dia. 3 |
|
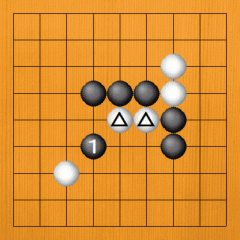
· Dia. 4 (correct answer). Setting up a net with Black 1 is the correct answer. The marked white stone can't escape. |
|
Dia. 4 |
|
· Dia. 5. If White 1, Black captures him with 2. If next White X, Black captures. |
|
Dia. 5 |
|
· Dia. 6. White 1 also fails when Black blocks at 2. The geta or net is an effective tesuji for capturing stones. |
|
Dia. 6
|
(Problem 3)
· This time there are two white stones. The marked stones can be captured not by chasing them but by lying in wait. Again, the geta proves its usefulness. |
|
Problem 3 |
|
· Dia. 1. When Black plays 1, he can capture the marked stones with 3 only if White plays elsewhere with 2. White will, of course, use 2 to pull out his stones. |
|
Dia. 1 |
· Dia. 2. If Black 1, White escapes with 2. If Black 3, he links up with 4. Instead of 3 -->
(Go to the next diagram) |
|
Dia. 2
|
|
· Dia. 3. Chasing with Black 1 doesn't work, either. If White 2 and Black 3, White 4 links up with his marked stone. |
|
Dia. 3 |
|
· Dia. 4. Chasing with Black 1 is also no good. White has various answers, for example, linking up to the marked stone with 2. |
|
Dia. 4 |
|
· Dia. 5. Even if Black goes one step ahead with 1, White flees with 2 and can't be caught. If Black 3, White successfully escapes with 4. |
|
Dia. 5
|
|
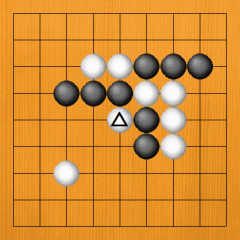
· Dia. 6 (correct answer). Instead of chasing directly, jumping ahead and lying in wait with Black 1 is the answer. This is a net: the marked white stones have been trapped. Let's confirm this. |
|
Dia. 6 |
|
· Dia. 7. If White plays out at 1, Black blocks his path with 2, so White can't escape. If White 3, Black 4: White can't do anything. |
|
Dia. 7
|
|
· Dia. 8. If White tries to escape in this direction with 1, Black blocks with 2, and there's no exit. If White 3, Black captures him with 4. |
|
Dia. 8
|
|
· Dia. 9. How about jumping to White 1? Black 2 fails. Letting White link up with 3 is no good. |
|
Dia. 9
|
|
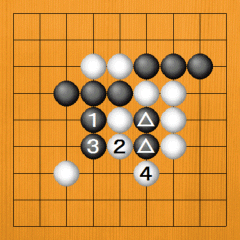
· Dia. 10. Black answers White 1 by pushing through with 2 and cutting off the two white stones. After 4, White can't escape. |
|
Dia. 10
|
· Dia. 11. How about White 1? This time Black pushes through with 2 and intercepts. If White 3, Black captures White with 4,
· The geta or net is one basic tesuji, but if you examine the variations, a lot of diagrams become necessary. Systematically analyzing all these variations in your head during a game is tough. It's important to study these tesujis and to get used to them. If you do so, the right move will occur to you without having to agonize about the variations. |
|
Dia. 11
|
(Problem 4)
· This is an application of the geta. Black to play and capture the marked white stone. |
|
Problem 4 |
· Dia. 1. You can't, after all, capture this stone simply by chasing it. If Black 1, White escapes with 2. Did you realize that this would endanger the marked black stones? If next Black 3, White captures the marked black stones with 4. Instead of 3 -->
(Go to the next diagram) |
|
Dia. 1 |
· Dia. 2. Even if Black flees with 1, he can't capture the two white stones. After White 2, if Black chases with 3 and 5, White just plays 4 and 6, capturing three black stones. Instead of 3 -->
(Go to the next diagram) |
|
Dia. 2 |
|
· Dia. 3. Even if Black chases with 1, he can't capture the two white stones. White links up to his marked stone and Black is helpless. |
|
Dia. 3 |
|
· Dia. 4. How about Black 1? White naturally flees with 2. So far, so good, but can you discover Black's next move? |
|
Dia. 4
|
|
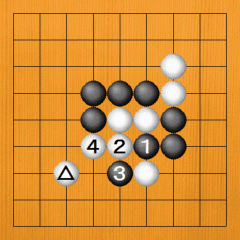
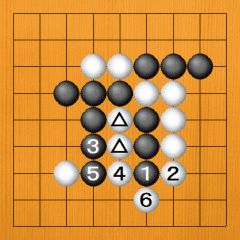
· Dia. 5. After Black 1 to 5, White not only escapes with 6, he also captures the three marked black stones. |
|
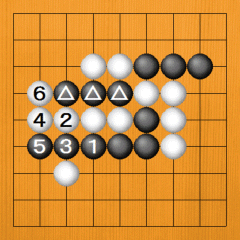
Dia. 5 |
|
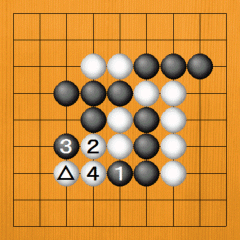
· Dia. 6. After White flees with 2, chasing with Black 3 doesn't work well. White 4 links up to the marked white stone. |
|
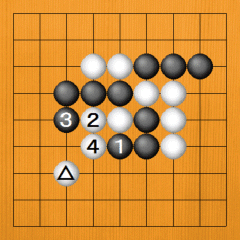
Dia. 6 |
|
· Dia. 7 (correct answer). Black 1 was correct, but after White escapes with 2 Black needs a tesuji. Next --> |
|
Dia. 7
|
|
· Dia. 8 (correct answer continued). Jumping to 1 is the net tesuji. White cannot escape. |
|
Dia. 8 |
|
· Dia. 9. If White 1, Black blocks his way out with 2, so White can't escape. |
|
Dia. 9
|
|
· Dia. 10. If White 1, Black captures him with 2. |
|
Dia. 10
|
(Problem 5)
· Black to play. The answer here, too, is more than one move. Black needs a tesuji to capture the two marked white stones. |
|
Problem 5 |
|
· Dia. 1. If in answer to Black 1 White plays elsewhere, Black can capture with 3, but this is too much to expect. |
|
Dia. 1
|
|
· Dia. 2. If Black 1, White links up to his marked stones with 2. Black is now helpless. |
|
Dia. 2 |
|
· Dia. 3. Black would like to stop White from linking up by playing at 1, but if when White flees with 2 Black gets flustered and hastens to seal White in with 3, White captures a stone with 4 and can't be caught. Black 1 is correct, but the follow-up is wrong. |
|
Dia. 3
|
|
· Dia. 4. After Black 1 and White 2, please think a little more. |
|
Dia. 4
|
|
· Dia. 5 (correct answer). Pulling out the marked black stone with Black 1 is correct. Can you see that the three marked white stones can now be trapped in a net? They cannot escape. |
|
Dia. 5 |
|
· Dia. 6. If next White plays at 1, Black blocks his path with 2. |
|
Dia. 6
|
· Dia. 7. It's the same if White flees with 1. He is captured by Black 2.
· With Problems 4 and 5, we showed some high-level tactics leading to nets. If you get used to tesujis like these, you will be able to discover them immediately in your games. Keep up the study! |
|
Dia. 7
|
|
|


