 |
[2]Ladders
(a) Example of a ladder
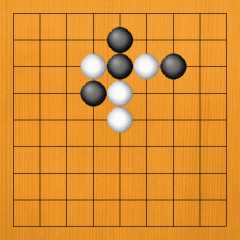
· This is another tesuji for capturing. It's a little more complicated than the net, but it comes up constantly in games, so it's worth remembering.
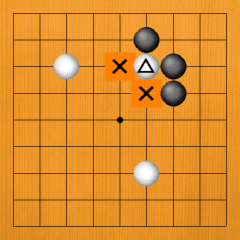
· Dia. 1. In order to capture the marked white stone, Black needs to play on both the X points, but he can't play two moves at once. |
|
Dia. 1 |
|
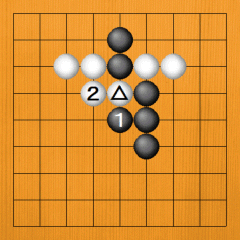
· Dia. 2. If Black plays at 1, White flees with 2 and can't be caught. |
|
Dia. 2
|
|
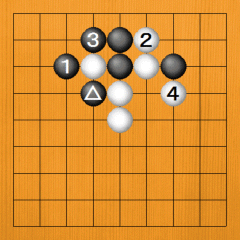
· Dia. 3. Chasing with Black 1 is correct, but the problem is what to do after this. When White escapes with 2, chasing with Black 3 fails, as White gets away with 4. Black 3 is dubious. |
|
Dia. 3
|
|
· Dia. 4. After White escapes with 2, chasing from the opposite side with Black 3 is clever. |
|
Dia. 4
|
|
· Dia. 5. Next, if White flees with 1, Black chases from the opposite side with Black 2. If White 3, Black 4 - if Black always chases from the side White has just played, White has nowhere to escape to. |
|
Dia. 5
|
|
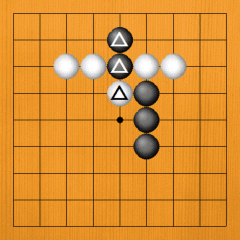
· Dia. 6. If White 1, Black keeps chasing with 2. Once White reaches the second line with 9, the rest is simple. |
|
Dia. 6
|
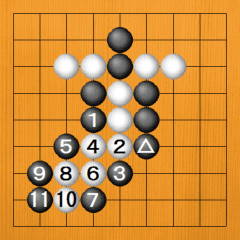
· Dia. 7. If Black chases from on top with 1, White runs into the edge with 2. Having come this far, Black knows what to do. If White 4, Black plays 5, taking all the white stones off the board.
· In this way, if you keep chasing from the side to which the opponent is escaping to, you reach the edge of the Go board and capture everything. This tesuji is called a ladder. |
|
Dia. 7
|
(b) An irregular ladder
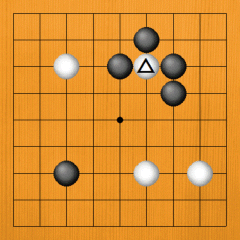
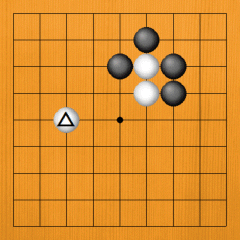
· Dia. 8. The two marked black stones are in trouble. The problem can be solved with a ladder. If Black captures the marked white stone, he can save his stones. What should he do? |
|
Dia. 8 |
|
· Dia. 9. Black wants to capture the marked white stone, but playing at 1 just lets White link up with 2, so it's hopeless. |
|
Dia. 9 |
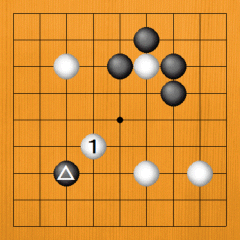
· Dia. 10. Black 1 is correct, but immediately chasing from the opposite side with 3 is a mistake. This lets White escape with 4, so Black 1 is now in trouble. Instead of 3-->
(Go to next diagram) |
|
Dia. 10
|
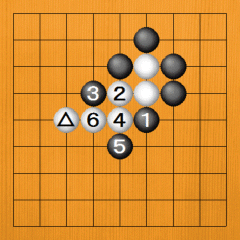
· Dia. 11. Black should chase with 1, then chase from the opposite side with 3. This way he gets a ladder. This is a tesuji when Black has the marked stone in place.
· The ladder is often not a tesuji that settles things simply; often the other side can take some compensation. |
|
11} |
|
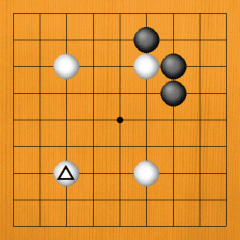
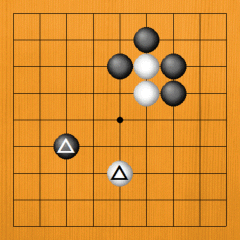
· Dia. 12. Black to play. Depending on how Black plays, White may be able to get a ladder. |
|
Dia. 12 |
|
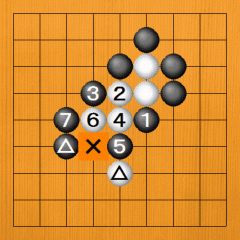
· Dia. 13. If Black links up his stones to the left and right with 1, White can get a ladder with 2. Even if Black escapes with 3, White chases him with 4; he drives him into the edge of the board and captures him. |
|
Dia. 13
|
|
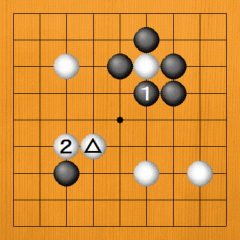
· Dia. 14. If Black plays 1 to deny White a ladder, White can't capture the marked black stone. In that case, he will play 2 and 4, taking the top right area as compensation. |
|
Dia. 14 |
(c) Ladder blocks
· A certain condition is necessary for a ladder to work, namely, that there be no enemy stone in the path of the ladder that disrupts it.
· Please look at Dia. 15. The marked white stone is lying in wait in the bottom left. What happens to the ladder in this case? Let's try playing out the ladder. |
|
Dia. 15 |
|
· Dia. 16. Black sets up a ladder with 1 and 3, but when White reaches 10 he links up with the marked stone. When there is an enemy stone in the path of the ladder like this, the ladder doesn't work. The marked white stone is called a ladder block. The condition for a ladder to work is that there be no ladder block, but sometimes the opponent plays a ladder block after the ladder has already been started. |
|
Dia. 16 |
|
· Dia. 17. The marked white stone has been captured in a ladder, but please confirm this by fleeing from the ladder. |
|
Dia. 17 |
|
· Dia. 18. Even if White flees with 1, Black chases him with 2 etc. Up to 10, the ladder works and Black captures White. This is where the tesuji of the ladder block makes its appearance. |
|
Dia. 18
|
|
· Dia. 19. White puts pressure on the marked black stone with White 1. Depending on how Black answers, White will decide his policy. |
|
Dia. 19 |
· Dia. 20. If Black defends at 1, White escapes with 2. When Black plays 3, it may look like a ladder, but after 8 White links up with the marked white stone and the ladder crumbles. After this -->
(See the next diagram) |
|
Dia. 20 |
|
· Dia. 21. Even if Black chases with 1 and 3, White gets away with 4. White now has three vacant points. In a ladder, the side doing the chasing gets a lot of defects in his position, so once the opponent gets three vacant points the situation gets out of control. Even if Black keeps chasing with 5, White counterattacks with 6 and 8. |
|
Dia. 21
|
|
· Dia. 22. Let's try chasing from the opposite side with 1. Once again, White can't be caught after he plays 2. Even if Black tries to stop White from linking up with 3 and 5, White 6 is sente, so Black is the one who is captured after 8. |
|
Dia. 22
|
|
· Dia. 23. The marked white stone was a ladder block, but Black can solve his problem by ignoring it and capturing with 1. The only thing is that White can make a second successive move in the bottom left with 2, so he gets a favourable result here. What this shows is that even when one of your stones is captured in a ladder, it's possible to make up for the loss by cleverly using a ladder block. |
|
Dia. 23 |
(Problem 1)
· Black to play. Can he capture the two marked white stones in a ladder? Please check by playing out the ladder. |
|
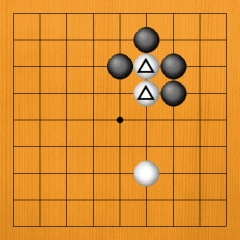
Problem 1 |
|
· Answer. Black can get a ladder with 1 to 15. The marked white stone doesn't get in his way. |
|
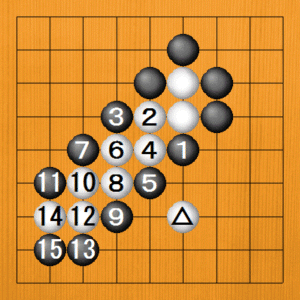
Answer |
(Problem 2)
· The marked white stone has been moved over one line. Can Black still capture in a ladder? |
|
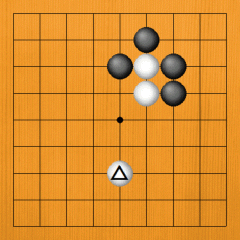
Problem 2 |
|
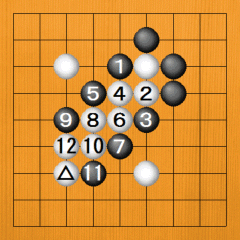
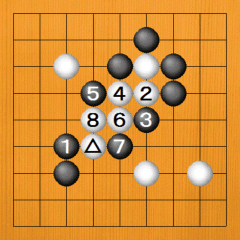
· Answer. Black sets up the ladder in the same way, but he runs into trouble after White 8. If he forcefully tries to continue the ladder with 9, White captures a stone with 10. The marked white stone was a ladder block. |
|
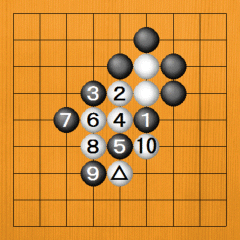
Answer |
(Problem 3)
· The marked white stone has moved to the left side. Please check if Black's ladder works. |
|
Problem 3 |
|
· Answer. Black sets up the ladder, but when White plays 6, he links up with the marked white stone. In this diagram, too, the ladder fails. |
|
Answer |
(Problem 4)
· There's a marked black stone and a marked white stone in the bottom left. This makes it difficult to tell if Black can get a ladder. You have to work it out carefully, step by step. |
|
Problem 4 |
|
· Answer. Let's try setting up the ladder with 1. Black 5 comes into contact with the marked white stone, which is a worry, but Black 7 traps White: continuing with White A would be futile. The marked black stone makes the ladder work. You have to confirm this to know whether it's a ladder. Looking ahead like this in your mind is called 'reading', and it's an important element in Go. Reading is necessary not only with ladders but in various parts of the game. |
|
Answer |
(Problem 5)
· The location of the marked black stone has changed. Will it still be a ladder? Reading ability is called for. |
|
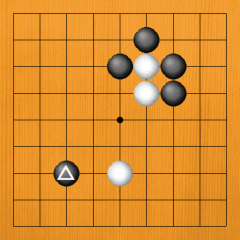
Problem 5 |
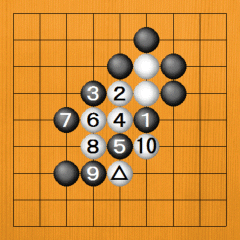
· Answer. Black sets up his ladder with 1, but he runs into trouble after White 8. Even if he tries to continue the ladder with 9, White captures a stone with 10. In this shape, the marked white stone has worked effectively.
· Subtle differences in the shape on the opposite side influence ladders. It's important to read carefully when setting up a ladder and when trying to escape from 1. Being able to read ladders would be proof of considerable improvement. |
|
Answer |
|
|


